Friday, April 27, 2012

A Little Home Oraganizing

Here are some photos of my new Home Organization Wall in my Kitchen. I used some "old" picture frames I got at Wal-Mart about a year ago for $6 each for another craft that ended up not getting done...some leftover cardstock from our Wedding Invitations and a few printouts from AnythingbutPerfect.com (I LOVE her printouts) and some budgeting guides from ThePeacefulMom.com (I LOVE her budgeting tools), and a little bit of cork board that I had from a previous project.


I started at the top with a frame with cork in it and put our Budget that showed our income and bills in a spreadsheet that is laid out to cover each month.

The middle frame has our monthly calendar in it...May is jam packed and we haven't even started the month yet..

The bottom calendar is our Family Dinner Menu.


Peace, Luv, & Crafting!


4th of July Wreath


Okay so here's my "tutorial" on how to make a 4th of July Wreath. I have seen some similar and really wanted one, but the Wal-Mart by my house is small and they didnt have any of the foam circular wreath 'thingys' so insead I found a box and used it to make my wreath.

I used Red, White, and Blue Yarn, Matching Material that I found at Wal-Mart for $.97 each in the craft department. And a Box for Cardboard.
I used a plate to trace the outside of the circle...
and a bowl to trace the inside...
And you have the inner and outter rings...then just use sissors or an x-acto knift to cut it out.
I cut 3 strings of each color to wrap around the cardboard. After they are in that huge pile I separated them by color....

Wrap them around the cardboard one color at a time. I used a drop of hot glue in random places to hold it in place.

Once you're done it should look something like this..

Now time to add some Fabric Rosettes. If you've never done them here is a great Rosette Tutorial from Little Birdie Secrets

I also added a few Rhinestones and Viola!!! A pretty 4th of July Wreath.

HAPPY CRAFTING!


Peace, Luv, & Crafting


Wednesday, April 25, 2012

The Peaceful Mom Blog

With Bun #3 in the oven I have decided that it's time for my DH and I to get a handle on reality! We both make really good money but I want to make sure that just in case something happens, we are taken care of.

I have started to read pretty deep into The Peaceful Mom Blog.  This Blog is written by a woman named Kimberlee. Reading through her blog she seems to me to be a strong and wonderful woman who has a good head on her sholders. With 4 children over the age of 10 she keeps her head straight while managing a household on less than most of us make, and makes it work. Her story and ideas are very inspirational and I hope that you find your way over to her blog and find something to make your life easier.

I have learned so much and will be following her through the next few months to prepare my home to be a well budgeted, well organized home for my family. I am very grateful to have found this blog, and to have a path to follow through the next few months of De-Stressing My Home!!! This is definately something that more people should know about!! So take a quick peek into her blog and see what you can find to De-Stress Your Life!!


Peace, Luv, & Crafting!

Tuesday, April 17, 2012

4x6 Recipe Card Tutorial

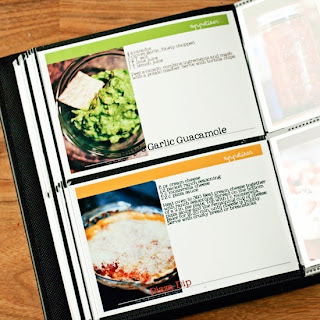
Okay…So while caught up in one of my Pinterest excursions I came across the awesome idea. Print recipes on 4X6 cards and put them in a binder using photo inserts.


While trying to click on the photo for it to take me to the blog of the awesome lady who came up with this, it took me straight to a site that my computer automatically said was a threat.
So I have come up with a little “tutorial” on how to create 4X6 recipe cards of your own using Word 2010. And if anyone out there comes across the real blog that inspired my idea please let me know, I’d love to credit him or her.

Okay so here we go. Start off by opening Word. Once we have Word open, click the tab “Page Layout” and you will then want to select the “Size” and go all the way down to “More Paper Sizes”.
                              

The prompt asking you for the Page Setup will appear. You will want to select Custom Size in the first drop down, and then give your page a width of 6 and height of 4. (You can change the size to fit your personal needs.
                              
                                
After clicking “OK” you will be returned to the Word Main Screen where you will see that your paper has been changed to what you put in.


I started by inputting a photo of the recipe I will be using. I like using photos on my card but this is your chance to let your imagination run wild.

                              
Once you’re ready to input text click the “Insert” tab, then the “Text Box” selection. I chose the Simple Text Box but here again you can choose whichever one you like best.

                              
I am using the Rockford Text (Search Google if you like it for a free download), but you choose your favorite text and input the Name of the Recipe.


Next repeat the steps above for inputting a Text Box and type out the ingredients and directions. Change the font and size to make it fit on your card but make sure that you can still read it.


Once you’re done you can print these on blank 4x6 index cards and arrange them in a binder using photo pages. I’ll get a photo once I’m done…I have a lot of recipes to type!!


Peace, Luv, & Crafting!
Monday, April 2, 2012

Wedding Invitations

I haven’t posted in a while, even though I tell myself every day that as soon as I get home I need to open this up and jot down a few things. Just a few!!! Then I get home and start the cleaning, cooking and wedding stuff. I never imagined how overwhelming this could all be. Everyone keeps telling me how great it will turn out in the long run, but as the months are flying by, and my progress is slowing I am starting to become more and more stressed.
After about 3 different wedding invitation designs I have finally chosen one and thanks to the Acrosthec Planning Page it has been easier than I thought! She has some awesome templates and tutorials on her page that give someone like me the chance to sit back and take a deep breath! Using her templates and designs for the folded envelope from 12X12 Cardstock I have made my first rough draft of an invitation! I’d love input from you guys! I have till the end of this month to get them all made and ready to be mailed. I designed these on my own, with a little inspiration from 3 or 4 invites I have seen online.
I made the direction card which I did not post here, just for safety reasons…you know the deal! And I also created 3 different Information cards. The 1st one says that after the formal reception (No dancing or booze) that we will be going out to a fancy bar in downtown Austin, the 2nd one asks that they bring a special dessert for our “Family Dessert Table” and the 3rd one just simply gives the information about where they reception will be held.