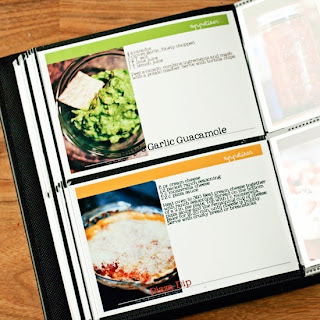
Okay…So while caught up in one of my Pinterest excursions I came across the awesome idea. Print recipes on 4X6 cards and put them in a binder using photo inserts.

While trying to click on the photo for it to take me to the blog of the awesome lady who came up with this, it took me straight to a site that my computer automatically said was a threat.
So I have come up with a little “tutorial” on how to create 4X6 recipe cards of your own using Word 2010. And if anyone out there comes across the real blog that inspired my idea please let me know, I’d love to credit him or her.
Okay so here we go. Start off by opening Word. Once we have Word open, click the tab “Page Layout” and you will then want to select the “Size” and go all the way down to “More Paper Sizes”.

The prompt asking you for the Page Setup will appear. You will want to select Custom Size in the first drop down, and then give your page a width of 6 and height of 4. (You can change the size to fit your personal needs.


While trying to click on the photo for it to take me to the blog of the awesome lady who came up with this, it took me straight to a site that my computer automatically said was a threat.
So I have come up with a little “tutorial” on how to create 4X6 recipe cards of your own using Word 2010. And if anyone out there comes across the real blog that inspired my idea please let me know, I’d love to credit him or her.
Okay so here we go. Start off by opening Word. Once we have Word open, click the tab “Page Layout” and you will then want to select the “Size” and go all the way down to “More Paper Sizes”.

The prompt asking you for the Page Setup will appear. You will want to select Custom Size in the first drop down, and then give your page a width of 6 and height of 4. (You can change the size to fit your personal needs.

After clicking “OK” you will be returned to the Word Main Screen where you will see that your paper has been changed to what you put in.


I started by inputting a photo of the recipe I will be using. I like using photos on my card but this is your chance to let your imagination run wild.


Once you’re ready to input text click the “Insert” tab, then the “Text Box” selection. I chose the Simple Text Box but here again you can choose whichever one you like best.


I am using the Rockford Text (Search Google if you like it for a free download), but you choose your favorite text and input the Name of the Recipe.

Next repeat the steps above for inputting a Text Box and type out the ingredients and directions. Change the font and size to make it fit on your card but make sure that you can still read it.

Once you’re done you can print these on blank 4x6 index cards and arrange them in a binder using photo pages. I’ll get a photo once I’m done…I have a lot of recipes to type!!

Next repeat the steps above for inputting a Text Box and type out the ingredients and directions. Change the font and size to make it fit on your card but make sure that you can still read it.

Once you’re done you can print these on blank 4x6 index cards and arrange them in a binder using photo pages. I’ll get a photo once I’m done…I have a lot of recipes to type!!
Peace, Luv, & Crafting!


1 comment:
Thanks for the tutorial for the 4”x6” recipe cards. I love the way it can be customized as per my design needs.
Post a Comment